Welcome welcome!
Today we have a Christmas Banner tutorial for you.
It's created by our talented DT Trish!
Do visit her at Doodles and Swirls.
Come back tomorrow for another project!
We do hope you are enjoying yourself!
Tuesday, November 8, 2011
Monday, November 7, 2011
Just Stamp It!
Hi everyone,
I thought I'd share a layout I recently made using only stamps and masks. Well it ended up using only stamps and a mask since I was prepared to use some paper but in the end just didn't hehe
Here's the finished layout -

Here are the steps -
1. Place mask of choice on to a chosen area on plain CS (I used white but light cream would be great too)
2. Spray with mist of choice - I used Studio Calico's Mr Huey's 'Sunshine' here. It's up to you how strong or light the colours go.


3. I love stamping with script so I used my Tim Holtz's script stamp from the 'French Marketplace' collection and randomly stamped on the page near the masked areas.

4. I also stamped a border around the corners of the page to make my layout looked framed so to speak.


5. I then took a 'frame' stamp from Prima's older sets and again randomly stamped onto the page - don't be afraid to use different coloured inks for contrast. Here I used 'Pine needles' distress ink.
The top right corner stamped image is light because I did 'secondary stamping' i.e. I didn't reink my stamp before stamping the image.

5. I stamped a bird inside the Prima frame. However, when I started adding my photos I realized that they would be covered. So I stamped the frame again on a scrap piece of CS, misted it and used adhesive foam pads to layer on the original frame.

Loved this outcome as it made my page have a bit more of a 3D look to it. I'm not the best when it comes to 3D-ing embellishments on my layouts but I try =)
Now for photo placement -
I had three sequencing photos of us playing with some autumn leaves. It's one of those 'I must take pics of' moments and I'm so happy with the outcome! This was my first taste of Autumn as two years running, I was back home.
I decided to crop the pics and place them so they are pleasing to the eye. I usually just eyeball this and move the pics around until I liked how they looked on the page. Then I adhered them to the layout.
I then added my title and my journaling. Before that I found a clear sticker which had the definition of 'joy' on it and added it since 'joy' was definitely part of this layout's theme!
Lastly, I distressed the edges of my layout with 'Gathered twigs' distress inks (part of the limited edition set - have you seen the winter ones? They are AWESOME! Just got them in the mail today. Can't wait to have a play!).
Oh and now you're done *LOL*
Hope you have a play with your masks and stamps because it's so much fun and I do believe I don't play with them enough!
Don't forget to come back tomorrow for our CCW Christmas Countdown Day 8!
See ya then!
Christmas Countdown Day 7
Hi!
Today we have for you a superb creation by our Guest DT Jennie.
It's a lovely altered jar!

Please visit GDT Jennie for more info!
See you again here tomorrow!
Today we have for you a superb creation by our Guest DT Jennie.
It's a lovely altered jar!

Please visit GDT Jennie for more info!
See you again here tomorrow!
Sunday, November 6, 2011
Christmas Countdown Day 6

Saturday, November 5, 2011
Christmas Countdown Day 5
Hello again!
Today on Day 5 we have for you November's Scrap Map!
Here's the sketch that you can have a play with -
 Here's my take using CCW's September kit which included the lovely Alla Prima papers -
 and some details -
 I created a tear at the side of the page and backed it up with some patterned paper to create texture.
 I also used some Prima bling, cut it up and placed them all over the page. For more texture I dry embossed some of the plain designed paper and then swiped over the raised areas with 'Bundled Sage' distress ink. This really worked well with the colour palette for these set of papers! Love it!
 To add more to the plain background, I did some stamping with one of Tim Holtz's script stamps! I didn't want the stamp to stand out too much so I used a very light distress ink - Antique Linen - Perfect! (Can you tell how much I love my distress inks?)
Anyway do pop over to the CCW blog for more samples from our fabulous DT!
Don't forget to drop by tomorrow for another crafting project!
Hope you have a crafty weekend!
Friday, November 4, 2011
CCW Christmas Countdown Day 4
Hello! Today it's my turn to show you some creative how-to!
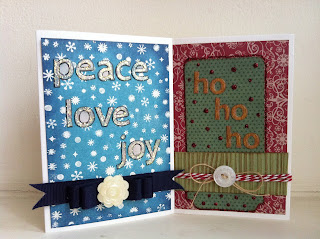
I've got two Christmas cards to share today - these are also my 1st ever Christmas cards too so please be gentle *winks*
Here they are -
 Now on to the steps!
I've got two Christmas cards to share today - these are also my 1st ever Christmas cards too so please be gentle *winks*
Here they are -
 Now on to the steps!
Card 1 – Ho ho ho
1. Prepare your card base
2. Take 3 pieces of coordinating patterned papers (I used a freebie from a magazine by HOTP)
3. Emboss the more plain patterned paper and emboss with a woodgrain design

4. Assemble the patterned paper beginning with the busiest design.

5. Add twine by cutting a slit at the side of the card.
6. Tie a bow using string and add a button to it.
7. Adhere letter stickers to create ‘Ho ho ho’ and accentuate using glossy accents.
8. Add red stickles dots randomly onto card and inner border; let dry.

9. Card is done!
Card 2 – Joy, Peace, Love
1. Stamp background stamp using embossing ink on smooth white cardstock
2. Emboss with fine white embossing powder

3. Swipe Broken China distress ink all over embossed piece until you get a look you like. Wipe away excess ink with dry cloth or paper towel.

4. Ink edges with Chipped Sapphire distress ink for contrast.
5. Adhere to card base
6. Make a ribbon bow covering entire card length. I followed this tutorial (the overlapping bow) and add button onto the center.

7. Stamp JOY PEACE and LOVE with alphabet stamps that would fit card. I used Lawn Fawn (Quinn's ABCs) onto light blue patterned paper.
8. Cut out words, ink edges and place onto card.
9. Use diamond stickles to glam up title. Once dry, cover letters with glossy accents (this also prevents the glitter from falling off)
10. Card is done!
I hope you've enjoyed today's tutorial.
See you tomorrow for more crafty goodness!
Thursday, November 3, 2011
CCW Christmas Countdown Day 3
It's Day 3 of CCW's Christmas Countdown!
Today we've got a tutorial on how to make this festive door hanger!

It looks quick and easy to make!
Please head over to Lou's blog for more details!
Till tomorrow!
Today we've got a tutorial on how to make this festive door hanger!

It looks quick and easy to make!
Please head over to Lou's blog for more details!
Till tomorrow!
Subscribe to:
Posts (Atom)